ASRock's 5Gbit Journey and the Modern Transfer Bottleneck
ASRock's 5Gbit Journey
Some of you might have read our first sponsored article, a Z270 build guide, but today we are bringing you something different. This sponsored article will focus on a brand new technology, the new 5Gbit Ethernet standard, and two motherboards that carry it; the Z270 SuperCarrier and Fatal1ty Z270 Gaming i7.
Both of these ASRock motherboards carry one of the latest NBase-T controllers, the Aquantia AQC108. ASRock is the only vendor I know of that is offering 5Gbit networking to consumers, and they also made sure that these two motherboards offered three M.2 slots and extra storage options. Modern storage protocols and devices using NAND provide very high transfer speeds. While back in the day, 1Gbit made sense with HDDs, nowadays with SSDs the system can take advantage of faster networking, if only locally.
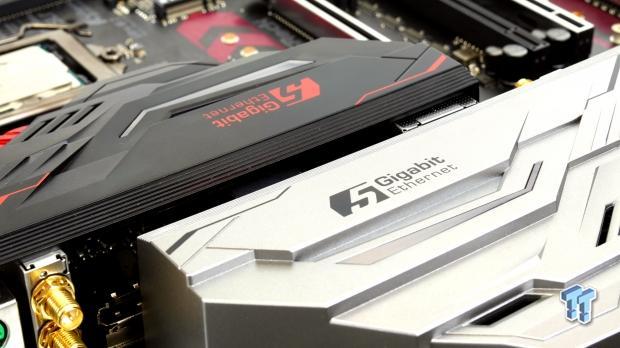
Why 5Gbit? The story began when vendors started to see a need for network speeds faster than 1Gbps, but couldn't justify the cost for 10Gbit infrastructure. Newer generation Wireless-AC cards were starting to exceed 1Gbps in throughput and 10Gbps over Ethernet requires Cat6a cabling, while most small offices and homes are wired with Cat5e. The NBase-T alliance was formed in 2014 and includes multiple OEMs such as Cisco and HPE and chip companies such as Intel and Aquantia. In fact, in 2015, IEEE decided to use the NBase-T specification to produce the 802.3bz standard that would make 2.5Gbps and 5Gbps speeds over 100m Cat5e and Cat6 possible.
In September 2016, 802.3bz was standardized and approved. Come early 2017, and ASRock is the first consumer motherboard vendor to integrate 2.5Gbps/5Gbps NICs into their Z270 and even X370 motherboards. The benefit of the new Aquantia 2.5/5Gbit NICs is that they will work with older Cat5e cabling, and will work with many of the NBase-T routers, switches, and access points shipped in 2015.
The Modern Bottleneck
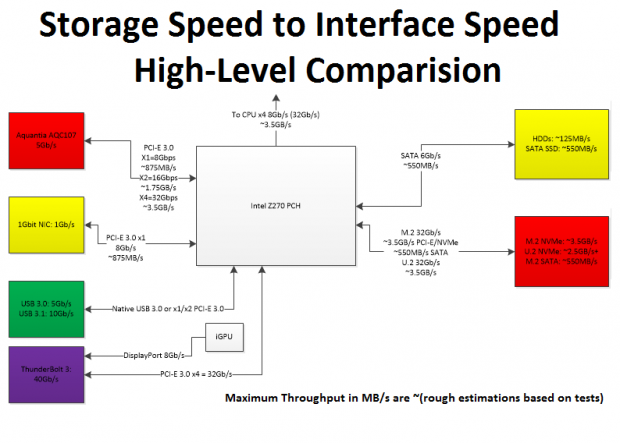
A byte is equal to 8 bits, and it's important to differentiate Megabytes per second (MB/s) and Megabits per second (Mbps or Mbits). You should be able to divide numbers in Mbps by eight and then see how many MB/s you would get, however, we also have overhead, so in reality, we never get a clean cut bits/8 to get throughput in bytes.
For instance, the DMI in modern Intel chipsets operates at 32Gbps (x4 PCI-E 3.0), which would give us 4GB/s throughput, but because of the 128b/130b encoding we lose 2% in theory, and in reality after all overhead, we are limited to roughly 3.5GB/s. When we test three fast NVMe drives in RAID 0, we are stuck with this maximum 3.5GB/s limited by the DMI.
SATA (realistically around 550 MB/s limit) and LAN protocols work in the same way, so we don't get 625 MB/s, but closer to 500 MB/s in real-world testing of the 5Gbit protocol. Keep this in mind with the chart and connection protocols, since overhead can be found in all connections. The one outcome that should be simple to see is that there is a need for a long distance local transfer protocol that is faster than the 1Gbit NIC, can reach the same distances, and doesn't cost as much as 10Gbit infrastructure.
For some, the 5Gbit NICs on ASRock motherboards teamed with other 5Gbit systems and NBase-T switches could be the perfect options, especially if the building is already wired with Cat5e.
The Z270 SuperCarrier and Its 5Gbit NIC
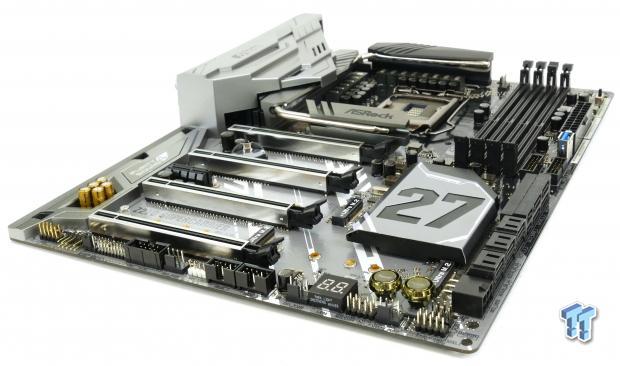
The Z270 SuperCarrier offers the 5Gbit NIC, two 1Gbit NICs, Wireless-AC, 4-way SLI/CrossFireX, three Ultra M.2 slots, ThunderBolt 3, and even overclocking features. If you want to know what we think of the motherboard, our review is located here. If you want to know more about the multi-GPU capabilities and the triple M.2 slots on the motherboard, the last pages cover those features.
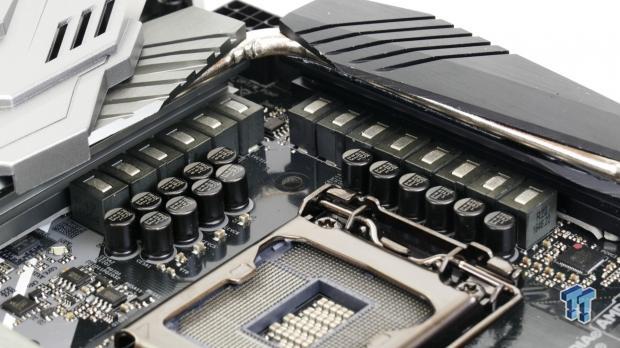
The motherboard's VRM is built with quality components. With multiple phases using Texas Instruments NexFETs matched with an International Rectifier digital PWM, 60A chokes, and 12K capacitors, it's total overkill for any LGA1151 CPU.
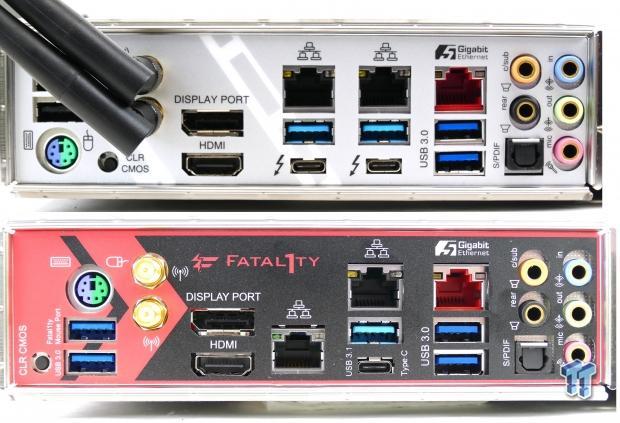
The Z270 SuperCarrier (top) and Fatal1ty Z270 Gaming i7 (bottom) are two of ASRock's top Z270 chipset motherboards. The Z270 SuperCarrier offers Thunderbolt 3 and 4-way SLI/CrossFireX over the Fatal1ty Z270 Gaming i7. In this article, I will have both boards use their 5Gbit NICs to transfer large files. ASRock has also ensured that both motherboards get dual Intel NICs to compliment the 5Gbit Aquantia NIC, as well as Wireless-AC.
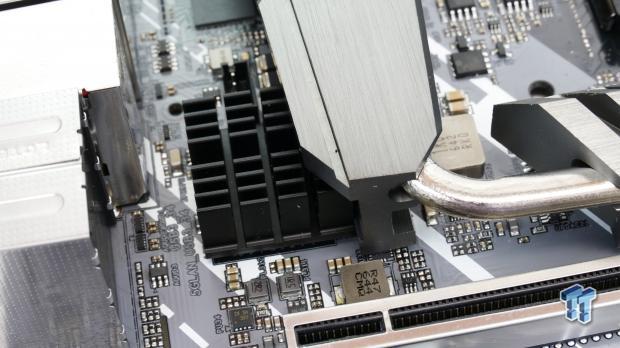
The Aquantia 5Gbit NIC does get warm, and ASRock has installed a dedicated heat sink to cool it down.
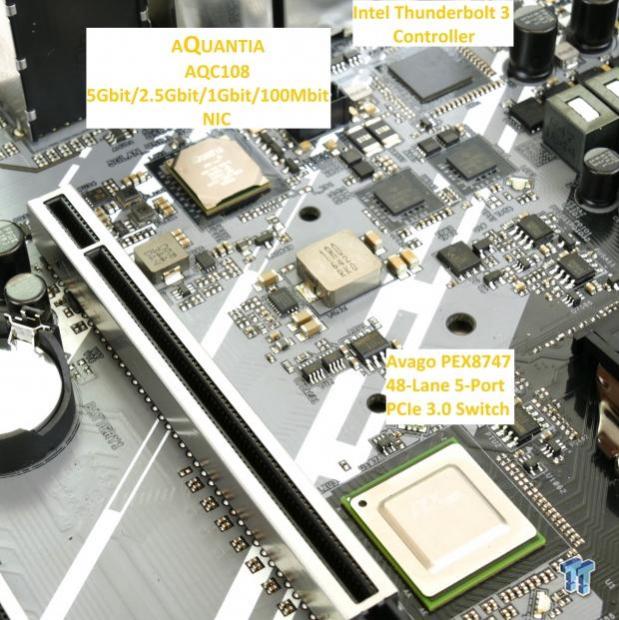
These three chips provide the high-bandwidth features on the Z270 SuperCarrier. Intel's ThunderBolt 3 controller is used with two Texas Instruments Type-C controllers to produce two ThunderBolt 3 ports. The Avago PEX8747 doubles the x16 upstream ports from the CPU to x32 downstream ports to support x16/x16, x16/x8/x8, or x8/x8/x8/x8 configurations for 2-Way, 3-way, and 4-Way SLI/CrossFireX. Finally, we have the Aquantia AQC108 5Gbit NIC, which we will cover now.
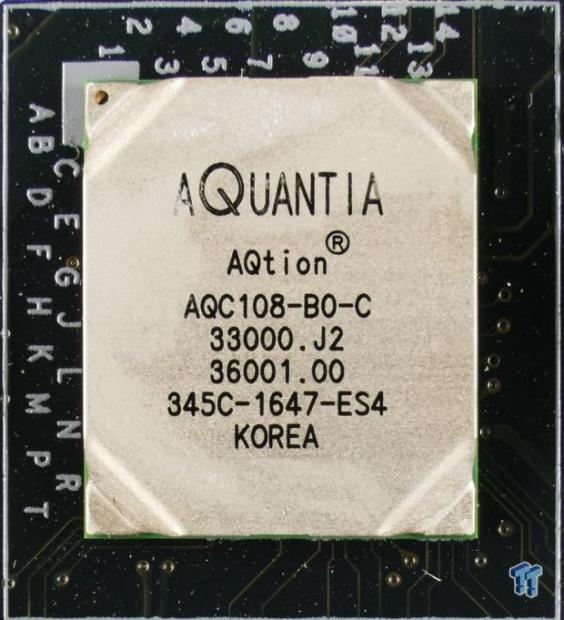
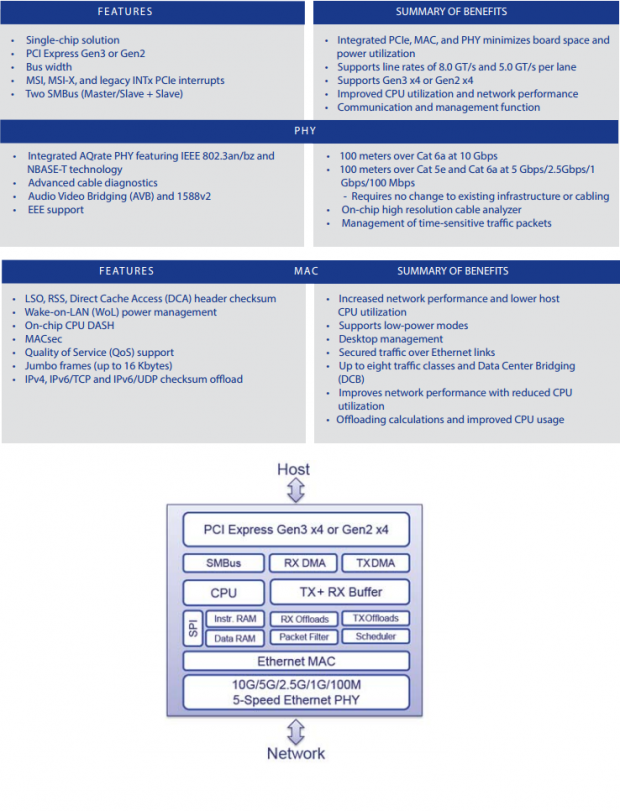
The Aquantia AQC108 is a four-speed NIC that incorporates both the MAC and PHY into a single package. It supports the NBase-T standard up to 5Gbps and offers 2.5Gbps, 1Gbps, and 100Mbps operation. It connects to the system through a PCI-E 3.0 x1, x2, or x4 connection, and to the rest of the world through either Cat5e or Cat6a cabling up to 100m long. The chip has a 3W TDP, and ASRock cools it down with a tiny heat sink.
Setting Up the 5Gbit Network
Physical Setup Using a Crossover Solution
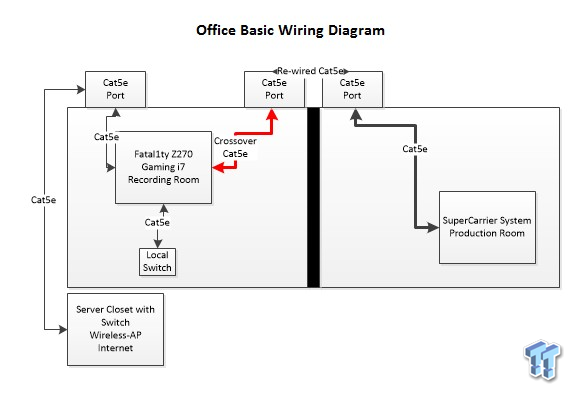
I have a small two room office within another larger office. I have a few part-time helpers who help me with everything from running benchmarks to making high-quality 4K videos for TweakTown. I also have a system setup with the Fatal1ty Z270 Gaming i7 that is used for recording, storing, and preliminary video transfer. In my office, I have my computer (Z270 SuperCarrier) where I do the major video editing and content creation, and I need a fast and easy way to transfer data between the two rooms.
The entire office is hardwired with Cat5e, and I don't have the resources or authority to change the wiring. Instead, I realized that two of the built-in ports were on adjacent sides of the wall, and I was able to splice them together with a crimp tool and coupler, to create a direct connection between the recording and production rooms. Once I did that, I lost the ability to connect to the rest of the office's network since the Production room only has one Cat5e port, but the Recording room has two. I then used a Crossover cable from the Fatal1ty Z270 Gaming i7 to the coupled Cat5e port and made a direct connection to the SuperCarrier system.
The recording room also has a dedicated secondary switch used to test out LAN speeds of motherboards and other devices there to be tested. So the Faral1ty Z270 Gaming i7 actually has to connect to three networks, and I was able to do it.
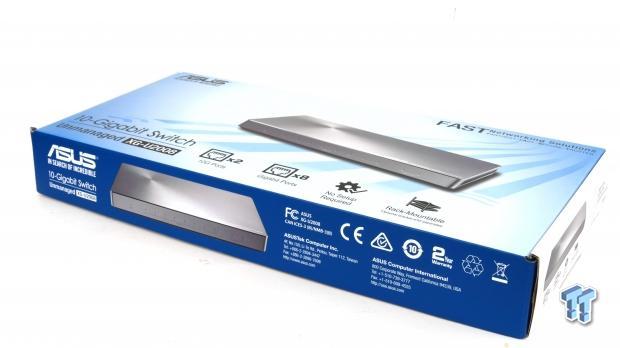
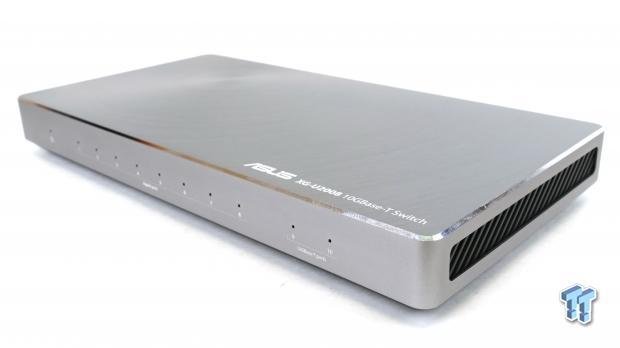
ASUS's XG-U2008 is used as the local DMZ switch for testing systems.
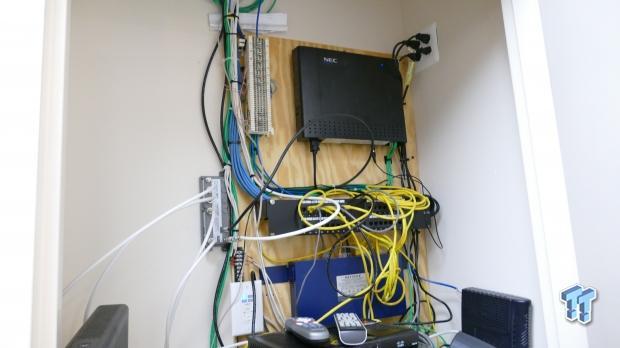
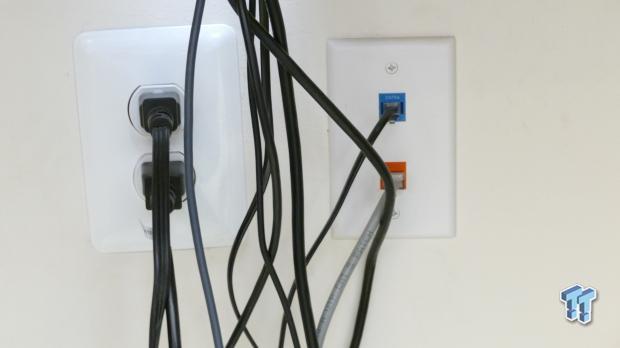
I am so sorry; I just had to show everyone how terribly the IT guys who have worked in this office have been. It's just disgusting, to be honest. However, they did wire up many of the areas with multiple Cat5e sockets, and just like most other offices, they cannot easily replace this cabling because it was put in during initial office construction.
PC to PC Connection Setup in Windows 10
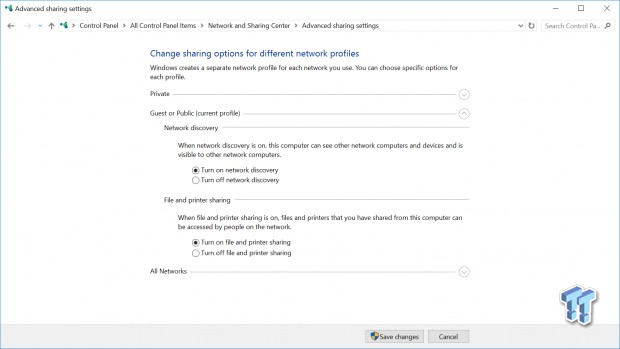
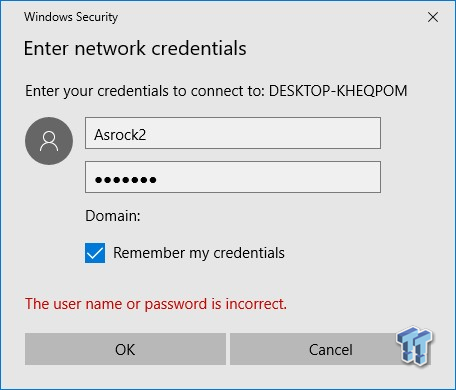
Normally you would use a patch cable to connect different device types together, such as a router and a PC, but when you connect the same type of device together, you use a Crossover cable. The Crossover cable connects the transmitting line of the host to the receiving line of the client and vice-versa. Once you connect the two 5Gbit NICs (you can also use it locally if you have two systems in the same room), all you have to do is turn on "Network Discover" and "File and Printer Sharing" on each machine. You will need to have a password on each PC; it's a rule within the OS. You will be prompted for the password when you try to double click the PC you are connecting to under the "Network" tab on the left side menu of File Explorer.
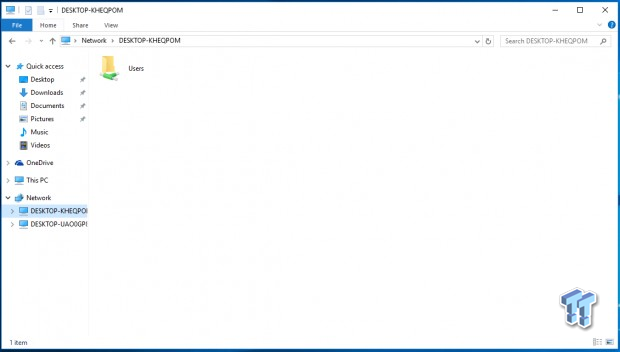
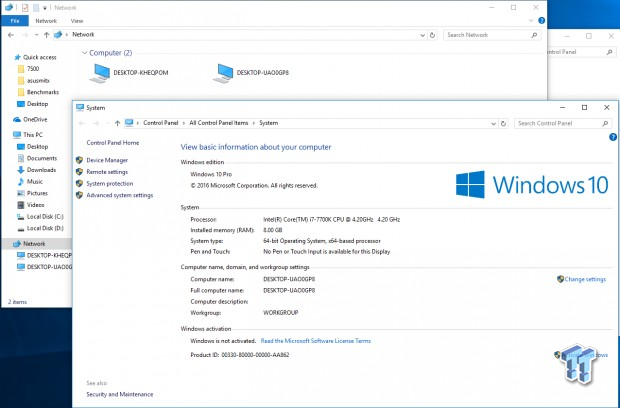
Once you enter in the credentials of the PC you are trying to connect to, you are then taken to a remote folder on the other PC. If you don't know what your PC is called, you can find it by right-clicking This PC and hitting properties. You don't need to go further. However, I wanted to setup a HomeGroup to restrict some access, and I wanted to bridge all the connections on the hub PC.
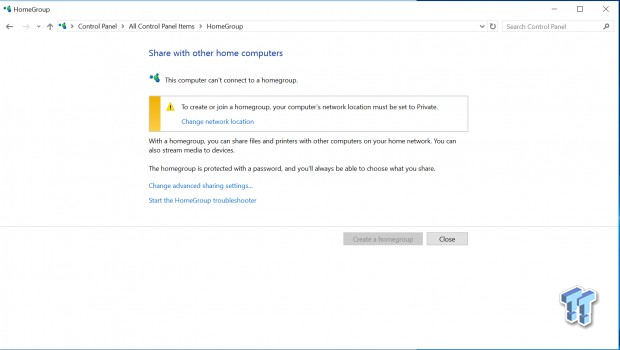
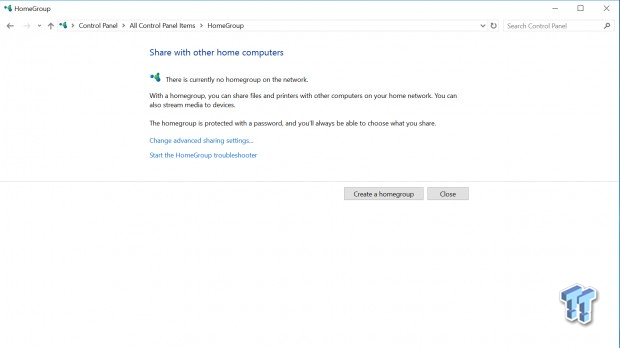
To setup a HomeGroup you might need to set the Network Location to Private; you will need to do this if you didn't hit "Yes" on the prompt Windows puts up when you first plugged in your network cables (I always hit no). Once you are private, you can select "Create a Homegroup," but only do this on one PC.
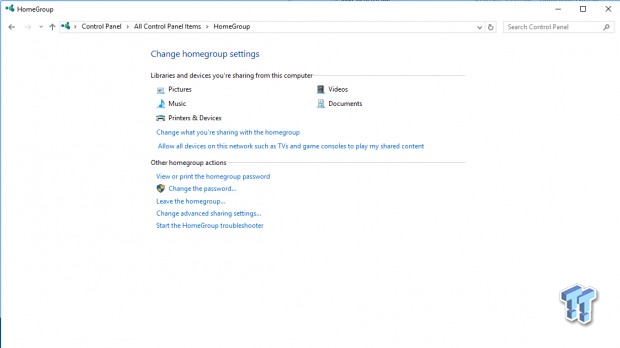
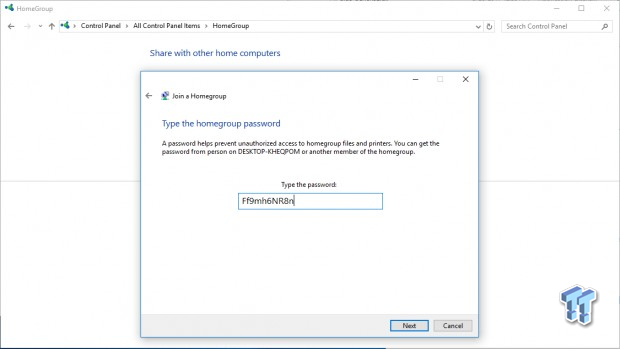
Follow the prompts for what to share; they are easy to navigate. You will then be given a password to enter into your other connected PC(s), enter it, and you will then finalize your home group.
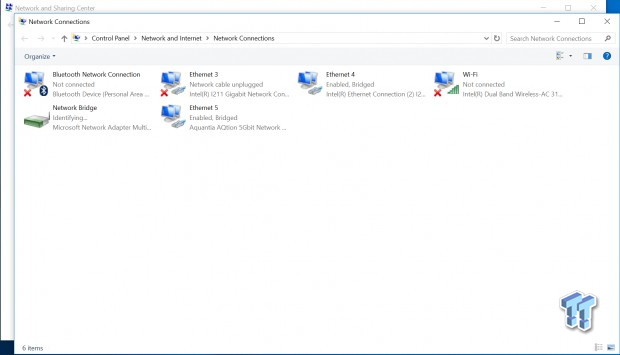
At this point, my main Recording Room PC is connected to the office network (with the Internet) and my Production Room SuperCarrier system. However, my SuperCarrier system needs the Internet. I went ahead and bridged the 5Gbit NIC and the 1Gbit NIC connected to the office network by right-clicking with both selected and selecting "Bridge Connections." Now the SuperCarrier system (in the Production Room) now has Internet, however....
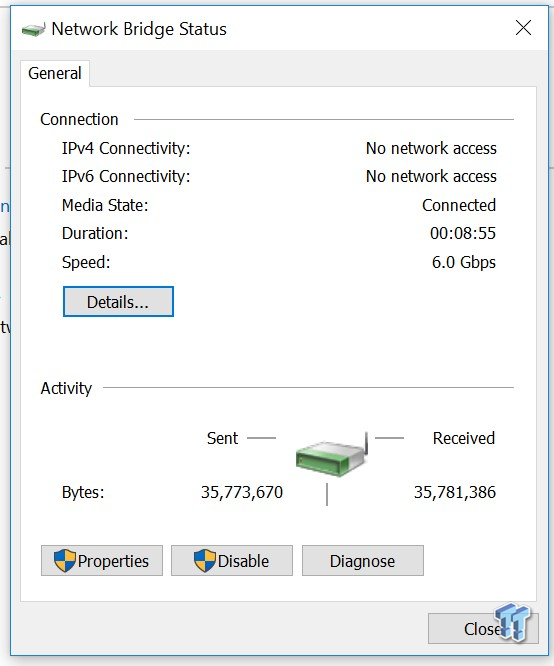
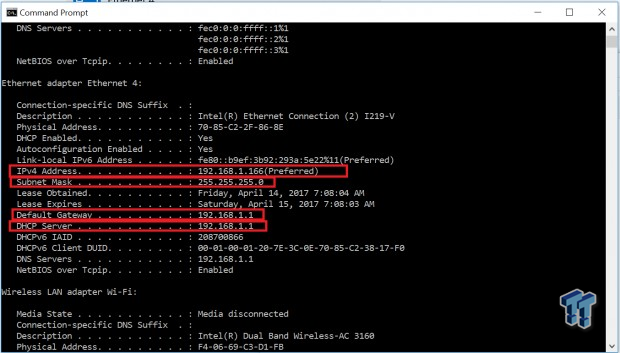
Bridging the connections gave the computer over the Crossover cable in the other room Internet, but disabled internet on the Recording Room's computer (the one connected to the office network). There is a fix! However, it's easier to do before you bridged the connection, you will need to go into the Command Prompt and type "ipconfig /all," where you will get all the information you need (boxed in red).
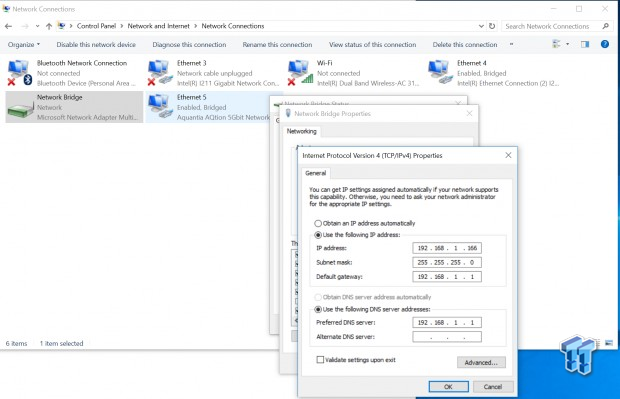
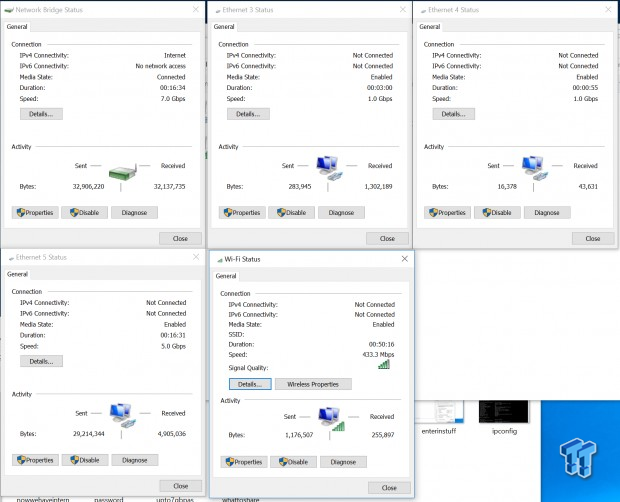
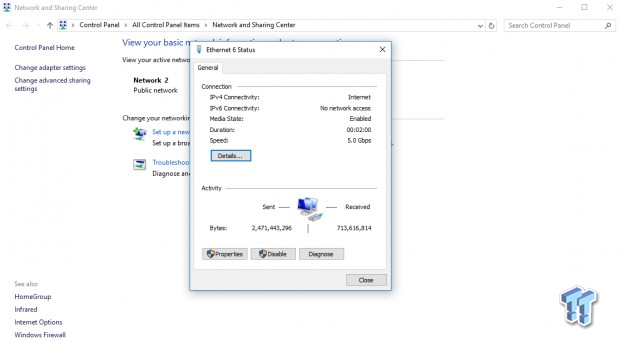
You will then take that information and manually enter it into the Bridge's IPv4 connectivity Properties. Now, both the Recording Room and Production Room have internet connectivity! I went one step further and added the secondary Recording Room network and WIFI into the bridge. As you can see, the bridge connection now has 7Gbps total of aggregated bandwidth.
Aquantia 5Gbit Delivering With Triple M.2
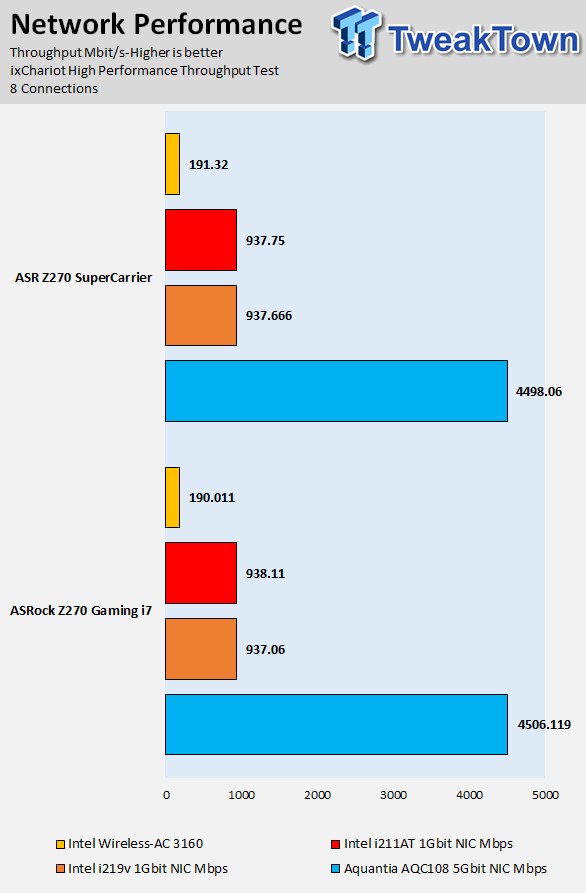
The IxChariot test gives us the best case numbers for bandwidth between two PCs. It's run by installing the program on the host, which then tests out client PCs and then it sends packets back and forth and determines throughput in Mbps. However, real-world testing is much more useful, and I did that below. What's the point of sending test packets back and forth? I want to know how fast I can transfer large files between two computers.
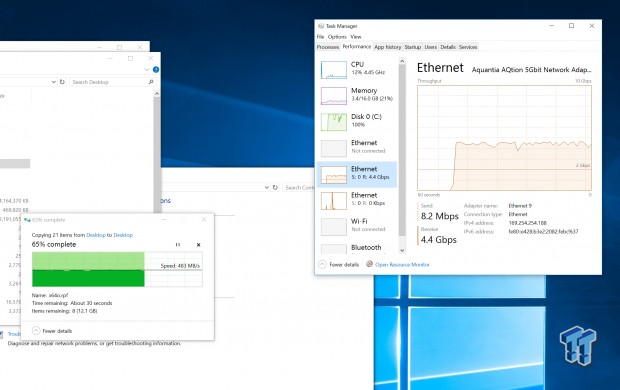
To test real-world performance, I decided to transfer a huge batch of files (with many large files) between the two computers. The Z270 SuperCarrier system was using a Samsung 950 Pro (M.2 32Gb/s with high read and write speeds); while the Fatal1ty Z270 Gaming i7 system used a Corsair Force 240 GB (SATA6Gb/s, average sequential speeds). I transferred the large folder within the GTA:V common folder between the two PCs, as it contains multiple GB large single files, so the drives on each side would have to utilize their sequential read and write speeds so that I could maximize the bandwidth over the network. With the high write speed on the NVMe M.2 SSD, I was able to maintain a constant 480 MB/s, 4.4-4.5Gb/s, on the 5Gbit network. These results are real-world, what I predicted, and are where they should be.
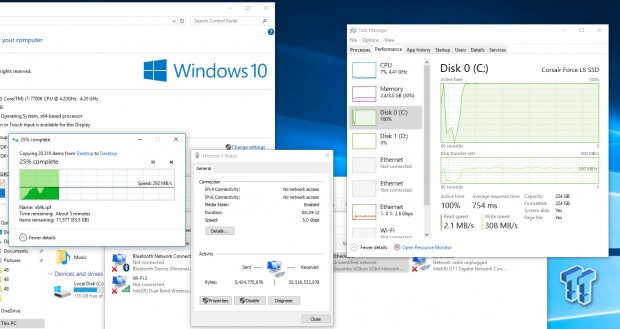
However, when I transferred the same folder of files to the Corsair SATA SSD from the Samsung M.2 NVMe SSD over the 5Gbit Network, the Corsair SATA drive wasn't able to keep up with the speeds and only stayed at the 300 MB/s level (still more than double what you can get over a 1Gbit network). So it does pay to use 5Gbit even with SATA, but it's more useful with higher speed NVMe drives.
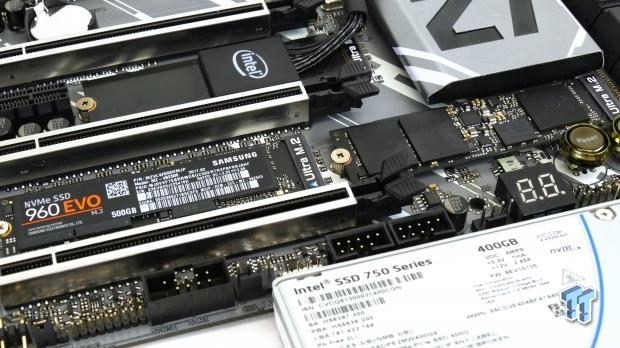
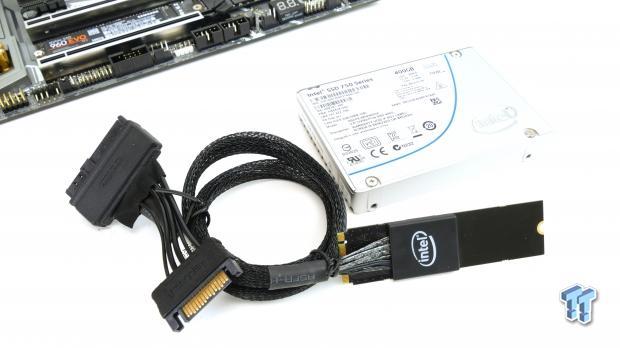
ASRock's Z270 SuperCarrier and Fatal1ty Z270 Gaming i7 both offer three 32Gb/s M.2 slots that can be used at the same time. Extra SATA ports, such as those on the SuperCarrier, allow you to still use SATA based drives even if the M.2 slot usage disables some of the SATA ports. Some people might be wondering why ASRock didn't incorporate a U.2 connector, and that is because M.2 to U.2 converters do exist, such as the one Intel bundled with one of our Intel 750 samples.
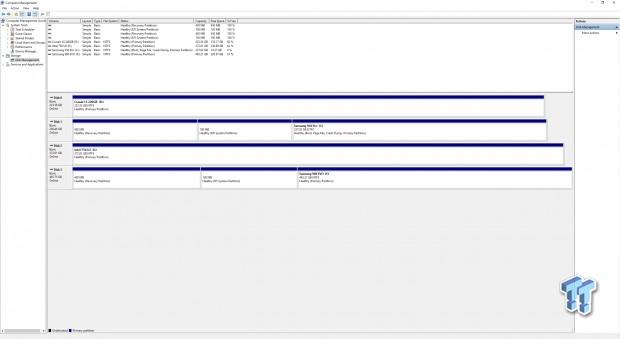
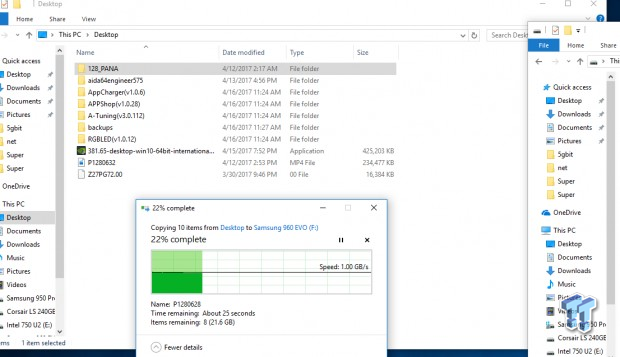
I have installed all the drives into the Z270 SuperCarrier, and we can see that NVMe drive to drive transfers can go upwards of 1 GB/s. The Desktop computer in the image above is using the 950 Pro, and it's transferring to the 960 EVO.


We can also see that the Corsair SATA drive still is limited to that ~300 MB/s transfer rate when it's being written too. Going back to NVMe based drives, the 960 EVO maintains high-performance when transferring to the Intel 750 that uses the M.2 to U.2 converter cable.
Z270 SupperCarrier Equipped For 4-Way SLI and Final Thoughts
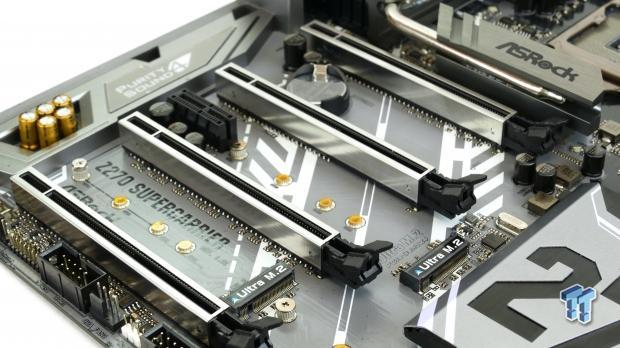
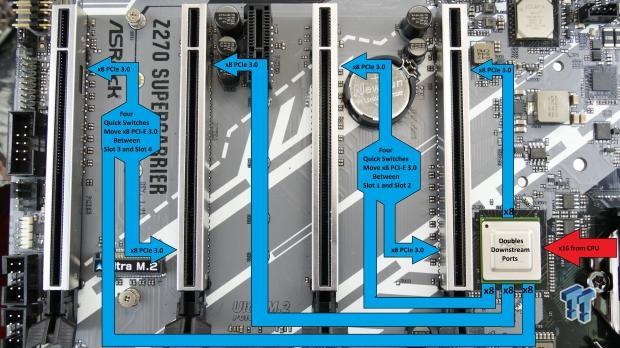
The Z270 SuperCarrier offers four full sized x16 slots that operate at x16/x0/16/x0, x16/x0/x16/x0, x8/x8/x16/x0, x16/x0/x8/x8, or x8/x8/x8/x8. The motherboard supports 2-Way, 3-Way, and 4-Way SLI and CrossFireX. The multi-GPU capabilities of the motherboard are made possible by the Avago PEX8747, which takes x16 PCI-E 3.0 from the CPU and outputs x32 PCI-E 3.0 to the slots below. It does incur a slight latency penalty, so it's not too useful with a single card, but with two or more cards, the chip and setup can be beneficial. You cannot run 3-way or 4-way SLI without this chip on a Z270 motherboard.
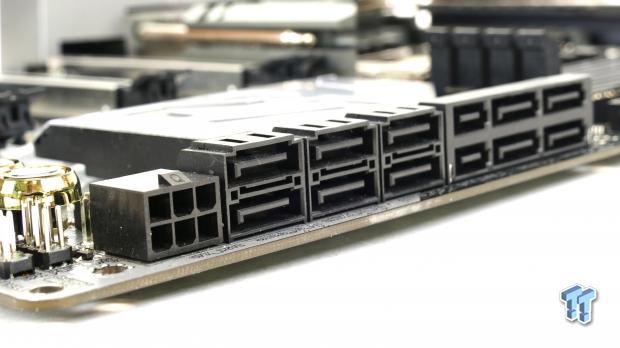
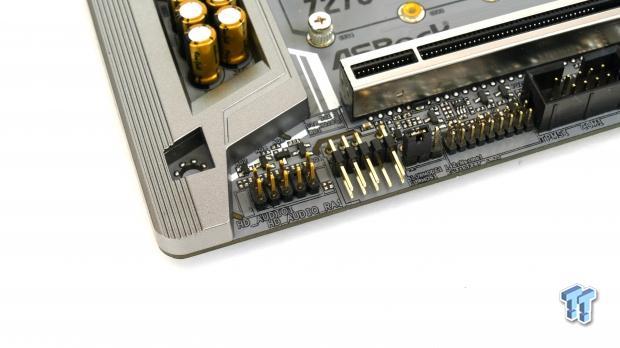
The Z270 SuperCarrier is equipped for 4-way SLI. It has a 6-pin power input that will push more power into the PCI-E x16 slots so that running 4-way SLI is possible as the 24-pin power connector doesn't provide enough power on its own. The motherboard also offers redundant HD audio output pin headers so that you can still plug into the header with a card in the last slot.
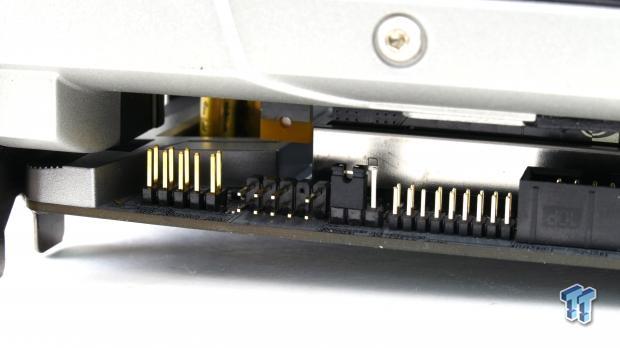
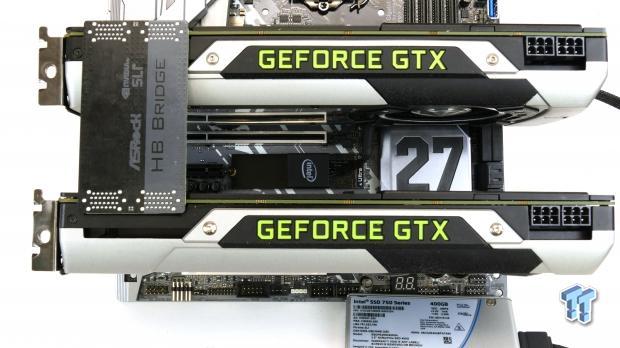
The Z270 SuperCarrier's right angled connector makes it easy to plug into the HD audio header when a card is installed in the last slot (like above). ASRock also supplies 2-way, 3-way, and 4-way SLI bridges. They also supply a NVIDIA SLI HB Bridge, which offers more bandwidth over a normal single flexible SLI connector.
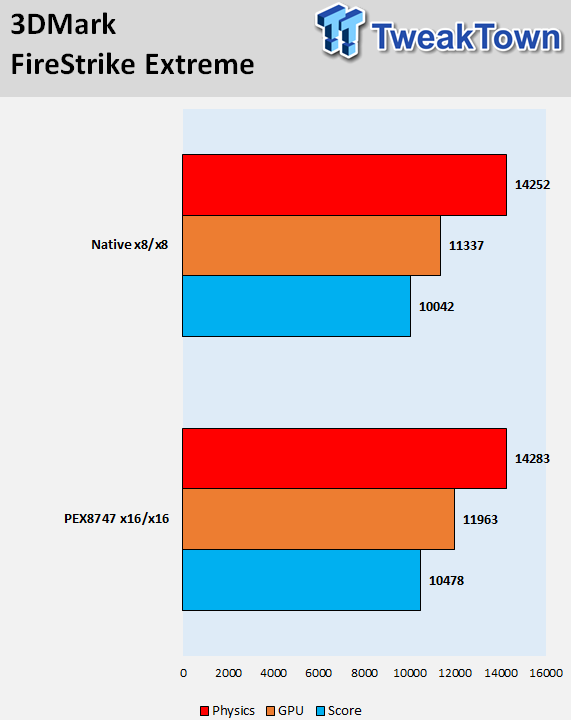
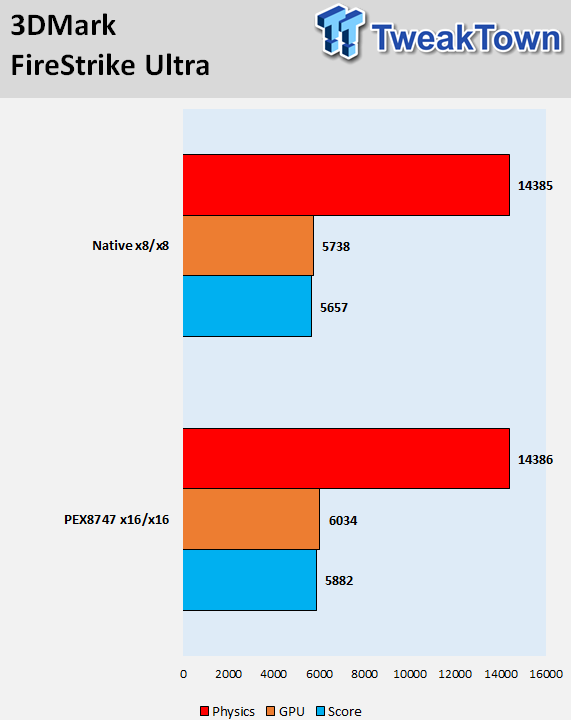
First off, I tested using 3DMark FireStrike Ultra and Extreme. The only difference between the Native x8/x8 system and the x16/x16 PEX8747 system is the motherboard. The native system uses the ASRock Z270 Gaming i7 while the Z270 SuperCarrier is used in the PEX8747 system. I used the most up to date BIOS and the same driver and software versions.
When only a single card is used, the PEX8747 can hurt performance, but with two or more cards it seems that performance is increased with the use of a PEX8747. However, that performance increase is marginal.
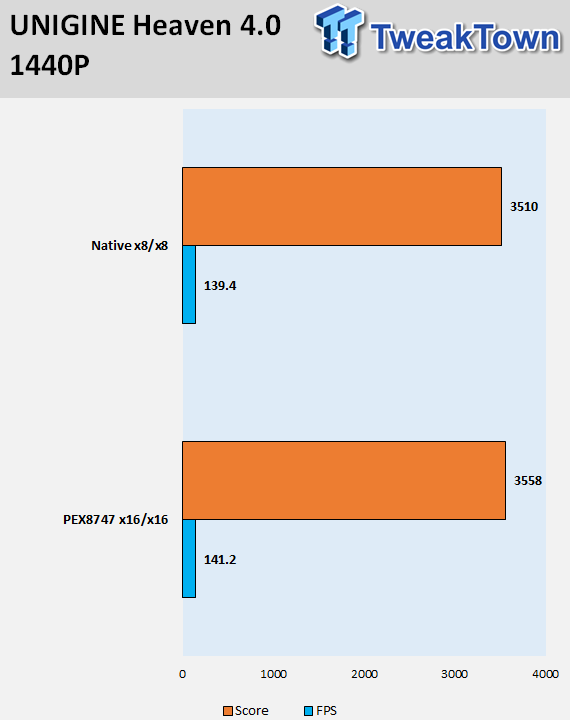
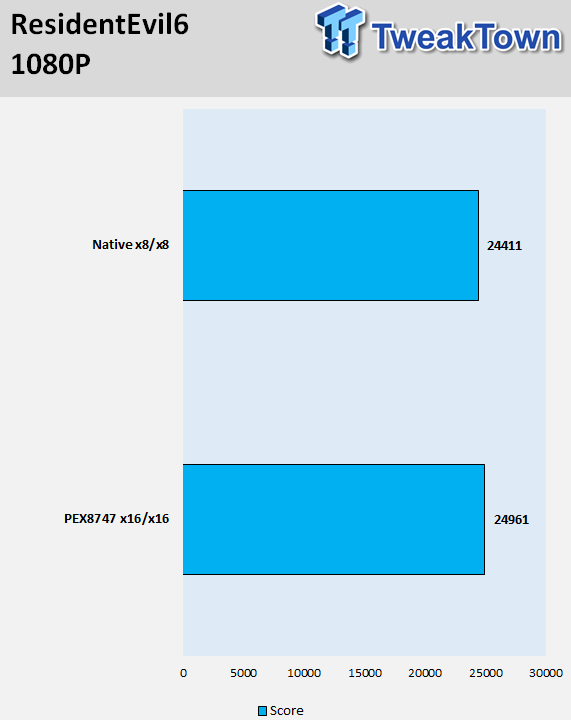
I also saw the same results in ResidentEvil 6 and UNIGINE Heaven 4 benchmarks.
Final Thoughts
The Z270 SuperCarrier and Z270 Gaming i7 are two well-equipped motherboards, and their 5Gbit NICs allow them to transfer files between each other at speeds faster than some SATA SSDs can produce. With throughput at up to 480 MB/s in real-world scenarios, the new 5Gbit network protocol gives your affordable Cat5e infrastructure a much-needed speed upgrade. Sure, there are faster protocols to transfer files between computers such as ThunderBolt 3, USB 3.1, and 10Gbit, but they either suffer from distance limitations or higher costs.
The 5Gbit NIC fills the gap between 10Gbit's performance and 1Gbit's affordability. As NBase-T switches and access points become more widespread, you will be able to leverage your Z270 SuperCarrier or Z270 Gaming i7 system into a network five times faster than what you had before.
The Z270 SuperCarrier is one of the few motherboards that support 3-way and 4-way SLI. The Avago PEX8747 PCI-E switch chip that ASRock has implemented makes this possible by doubling bandwidth to the slots. There is some benefit to this, even with just two cards. ASRock is a strong proponent of faster storage, and the implementation of three 32Gb/s M.2 slots on both motherboards is great for those who want to leverage the latest and greatest storage devices. SATA is saturated, and SATA Express is non-existent, leaving M.2 and U.2 as the optimal storage interface for the fastest drives. The good news is that you can convert an M.2 port into a U.2 port, in case you also want to be ready for drives that come out in that form factor.
The final thing I want to say is that ASRock has gone above and beyond with the Z270 SuperCarrier by offering more high-end and cutting edge features that do make a difference.
