The Basics and RAID Preparation
A redundant array of independent disks (RAID) is when you use multiple drives to achieve higher speeds or to ensure data is better protected. There are many types of RAID, and with two drives you can deploy RAID 0 or RAID 1. In RAID 0, the two drives combine into one with data written across both. It's like if you put two pieces of paper side by side and just continued to write out your sentences without going down a line until you reach the right end of the second piece of paper.
In RAID 0 if the two drives are identical then their total capacity will be the sum of their capacities (minus overhead), in theory, sequential performance can almost double, but if one drive fails, then you lose all the data. With RAID 1 the two drives are like clones of each other (mirror), with the point being data redundancy, so if one drive fails the other still has its data. With RAID 1 if your two drives are the same size then total drive size will just be the size of one drive, and you won't get a performance boost. Since modern SSDs are pretty reliable, we see many people stick with RAID0 rather than RAID1 as it offers performance benefits, and it's just cool.
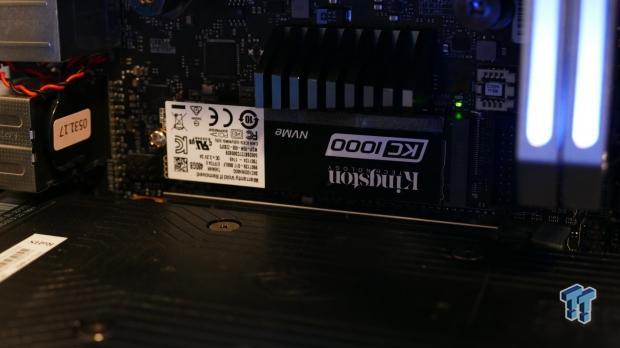
While the theory behind RAID is great, actually getting it up and running can be difficult for those who have never attempted it before. Today you will learn how to setup NVMe RAID, the latest in consumer RAID technology, on any of SuperMicro's Z370 motherboards. There are many settings to change, and they need to be changed in a specific order. We used SuperMicro's C7Z370-CG-IW mini-ITX motherboard, which offers two M.2 drives capable of NVMe RAID. Both of those M.2 slots are directly routed to the PCH and don't go through switches that are designed to share bandwidth. Kingston was nice enough to send over two 480GB KC1000 NVMe M.2 drives, which offer excellent performance.
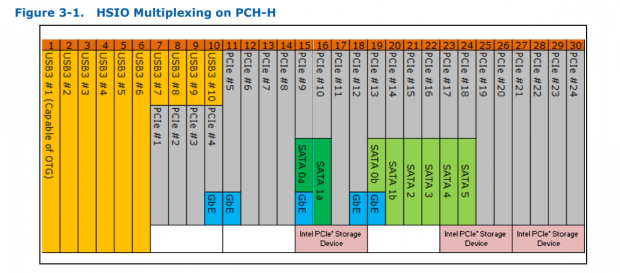
Intel's Z270 chipset is one of their most advanced; it offers the ability to RAID three M.2 drives (each with x4 PCI-E 3.0). However, there is a 3.5GB/s limit because of the DMI bus that connects the PCH to the CPU. Intel's RST technology is routed into each of these M.2 clusters (highlighted in red). We can see that some of the SATA connections overlap with some of the M.2 drive bandwidth, and many motherboards will share or switch bandwidth, but not the C7Z370-CG-IW.

We will RAID two x4 PCI-E NVMe M.2 SSDs, and we have to remap both of those drives to Intel's RST.
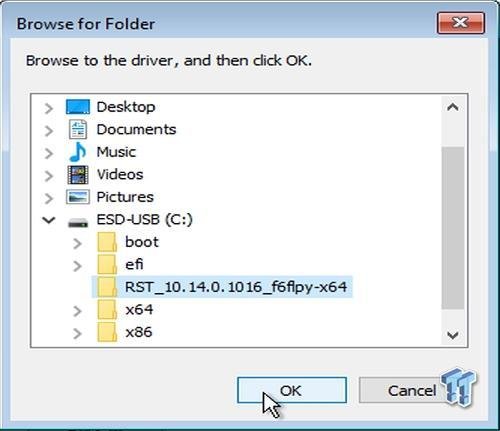
The first step is to create a UEFI installation medium for Windows 10. We highly recommend creating the Windows 10 installation medium with Microsoft's Media Creation Tool. We see people encounter tons of problems installing Windows 10 using different tools or just trying to manually do it. Just use the tool, it's really easy to use and takes care of everything, including formatting the USB drive correctly. Once you create the tool, you will also need to download and extract the Intel RST drivers, which you will need to put on the drive and load later in the process to detect the RAID array. You can extract the drivers to a folder in the USB installation stick as you see above.
How To Setup RAID
How To Setup RAID in the UEFI
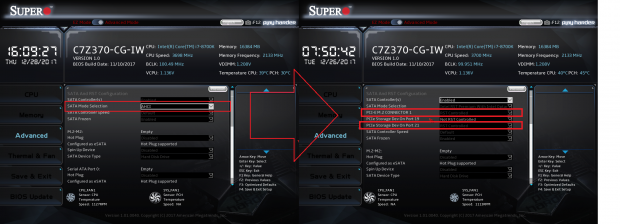
You must enter the UEFI by pressing 'Delete' during booting. The first step is to navigate to the SATA and RST Configuration menu under the Advanced tab, and change 'AHCI' to 'Intel RST Premium With Intel Optane Technology'. You also need to set 'PCI-E M.2 Connector 1' and 'PCIe Storage Dev On Port 21' to 'RST Controlled', this is called Port Remapping on some other motherboards.
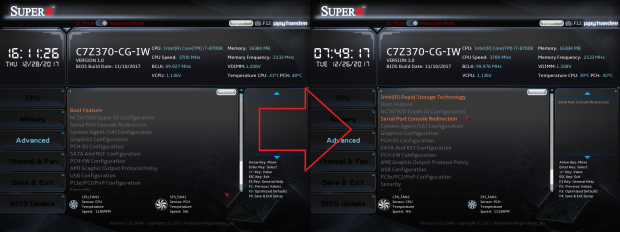
As you see above, the Intel Rapid Storage Technology menu is still hidden, so we must perform a few more steps until the Intel Rapid Storage Technology menu shows up.
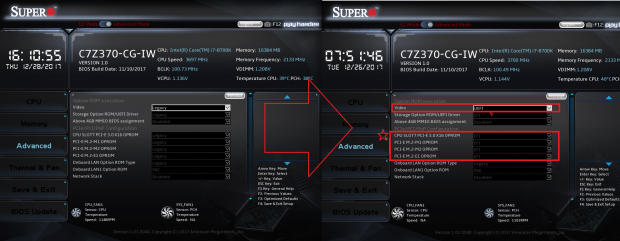
We have to get the motherboard into UEFI mode and to do that we must disable the Compatibility Support Mode (CSM). However, to be able to disable CSM we must first set the video and other ROMs to UEFI mode. Change the above in the 'PCIe/PCI/PnP Configuration' menu to 'UEFI' or 'EFI' from 'Legacy'.
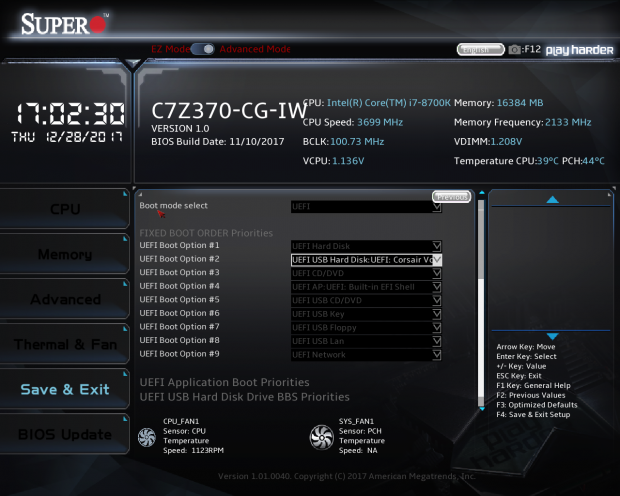
You can always Save and Exit using the 'F4' key, but you might as well go to the Save and Exit page and set 'Boot Mode' to 'UEFI' or 'Dual', and also set your USB installation key as the first or second boot option. Just FYI, even after you make your RAID array, it will not show up in this menu until you install Windows.
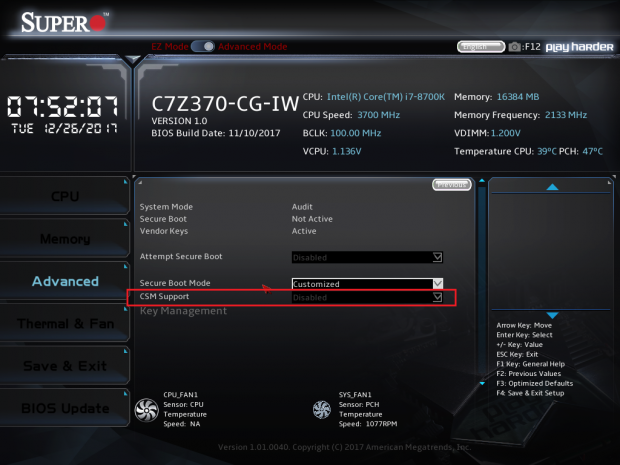
After you save and exit your UEFI changes, you can then enter the UEFI again and disable 'CSM Support'. The CSM setting is located in the 'Secure Boot' menu under the Advanced tab. Once you disable CSM support, you will press 'F4' and go back into the UEFI where you will find the Intel Rapid Storage Technology menu.
How To Setup RAID Continued
[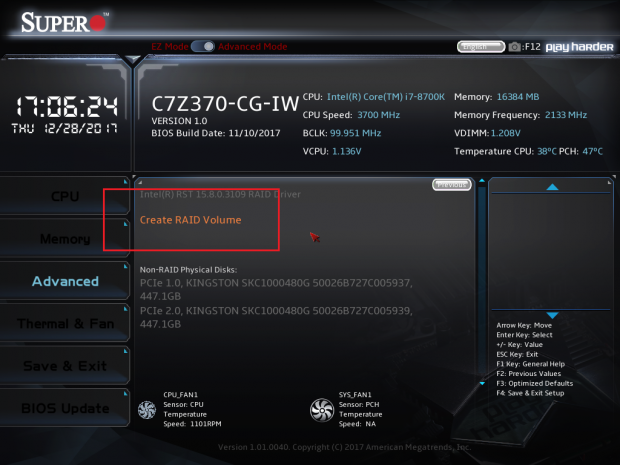
Once you enter the Intel RST menu, you will find your disks listed, and you will then click 'Create RAID Volume'.
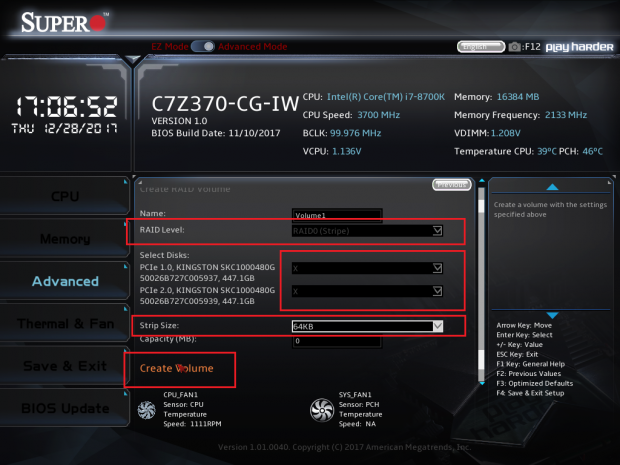
You need to set the RAID Level (we are using RAID 0), and then you must select the 'X' near each drive in the array. It might seem like 'X' means not selected, but here it means selected. You can also change the RAID strip size (default is 16KB), we are using 64KB. The strip size is the amount of data each drive will write to each strip. If you want to know more, you can look up strip and cluster sizes.
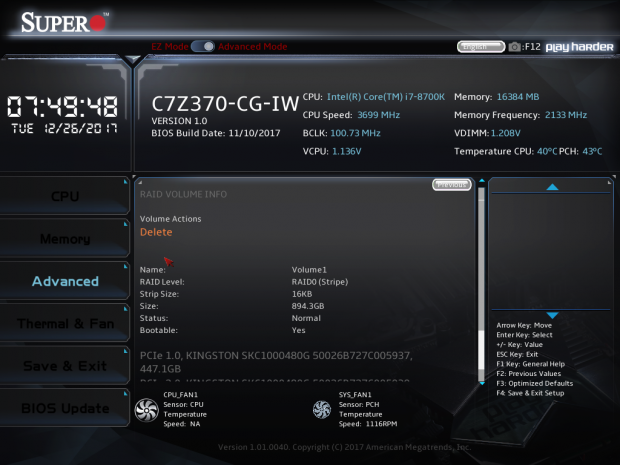
Once you create the RAID Volume, you can see its details. Your array should show a normal status, and it should be bootable.

Then hit 'F4' (to save and reboot) and you can also press 'F11' on boot up to force override boot to your USB stick. Follow Windows 10 installation prompts until you get to the screen where you are supposed to select your drive. You will not see any drive. Instead, you must load the Intel RST driver (click 'Load Driver' and find its location on your USB stick). Intel has a guide on how to install Windows 10 on a RAID array, you will find it on Step #22 of this guide under the PCI-E (NVMe) RAID directions.
RAID Results and M.2 Types
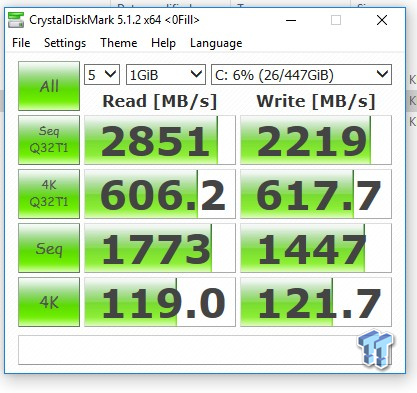
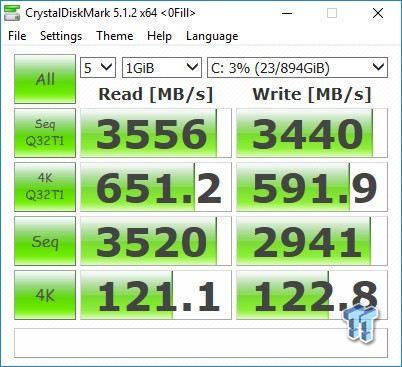
On the left, we have one KC1000 for comparison, and on the right, we have our performance on our RAID 0 array. We aren't able to double our sequential speeds because of the DMI's 3.5GB/s limit, but we do see noticeably higher sequential speeds. We also see that our 4K reads/write didn't take a hit but remained roughly the same, which is typical of a RAID0 array.
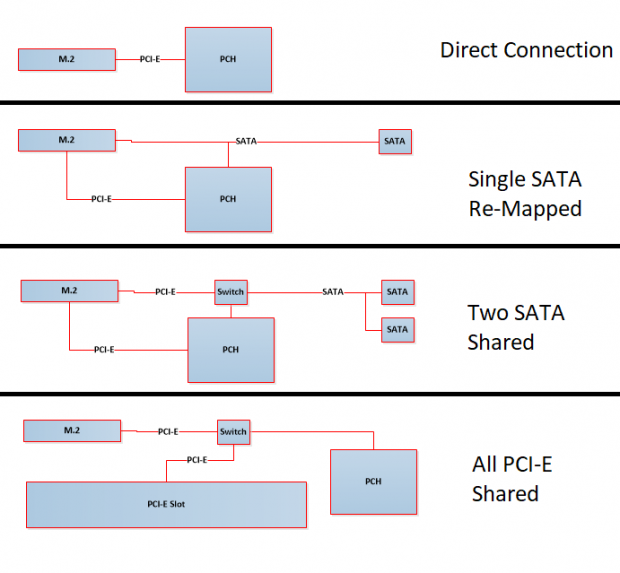
Going a bit off topic, not all of SuperMicro's (and other vendors) motherboards have their M.2 slots directly routed to the PCH like on the motherboard we used. Many motherboards (most) have M.2 slots that share bandwidth with other devices (mostly SATA or an x4 PCI-E slot). We wanted to see if the different types of M.2 drive connections interfered with drive performance. Quick switches can cause performance to drop a tiny bit, but let's see how much, just for fun!
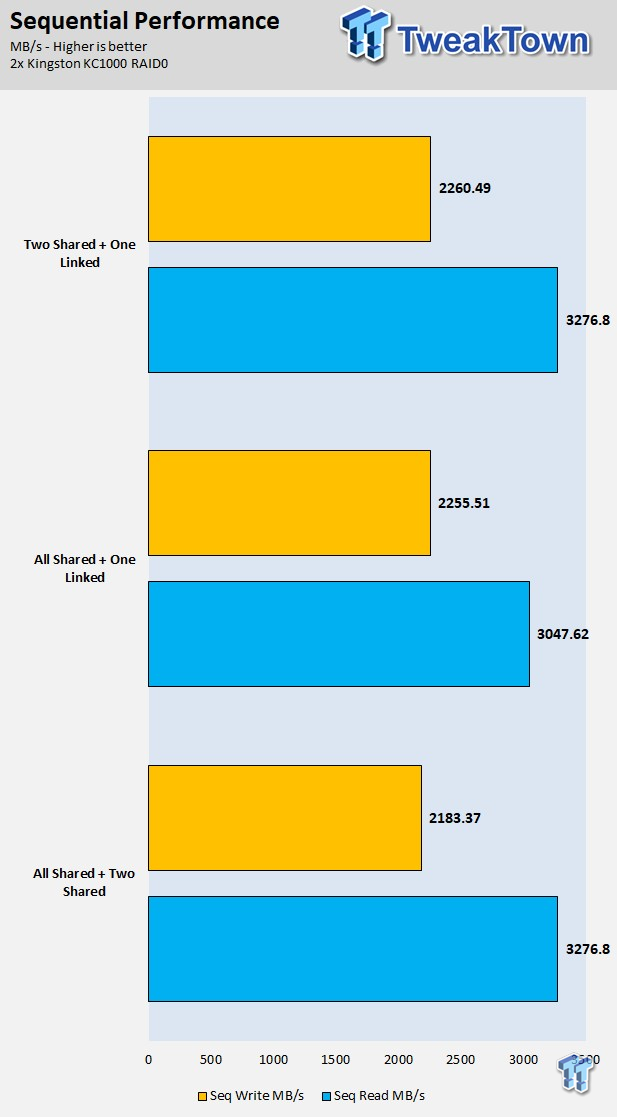
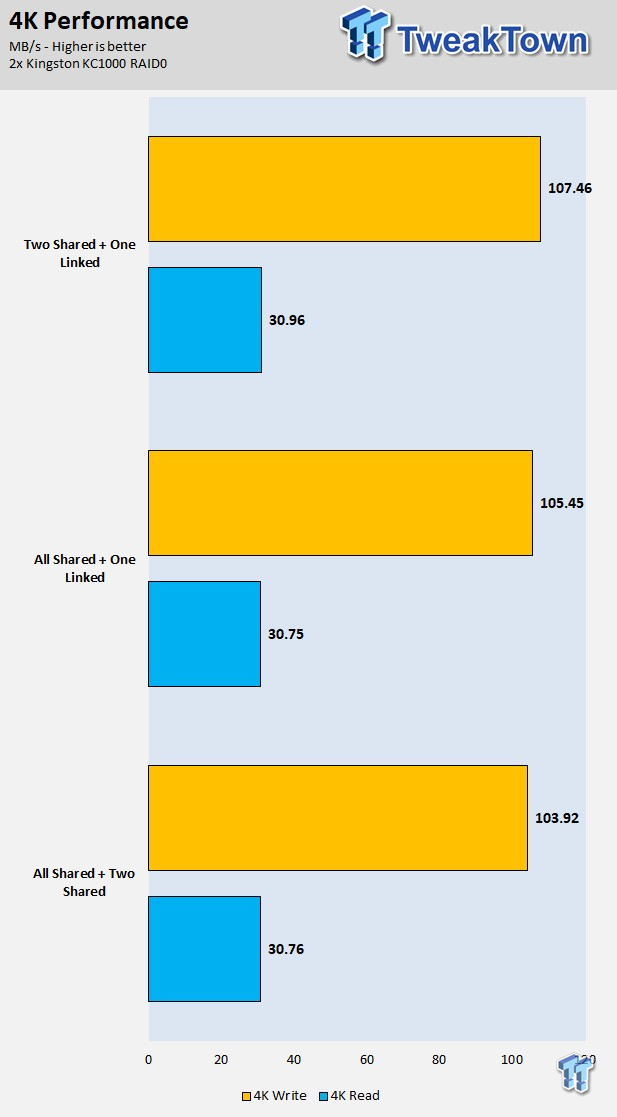
We took another brand's motherboard and ran it through the same tests using Anvil Storage benchmark, which is a bit tougher on the drives than CrystalDiskMark. The 'Two Shared + One Linked' should provide the best results, and the 'All Shared + Two Shared', which goes through the most switches, should produce worse results. We see that sequential and 4K writes actually seem to take a small hit, while reads don't really change. Overall though, we found that the types of M.2 slots aren't super important, but if you know the path your M.2 slots data travels, it's best to take the most direct route to the PCH.
